Just keep cladding

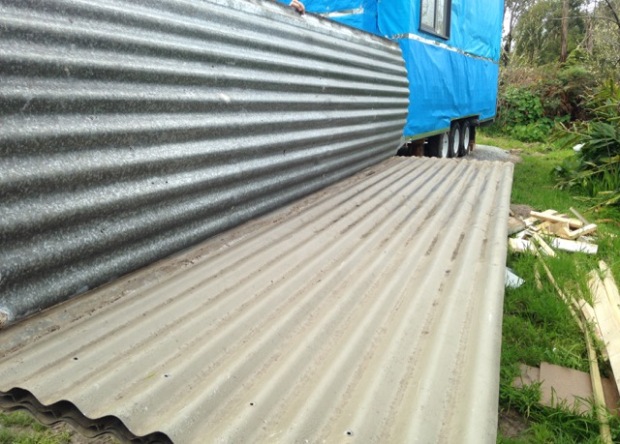
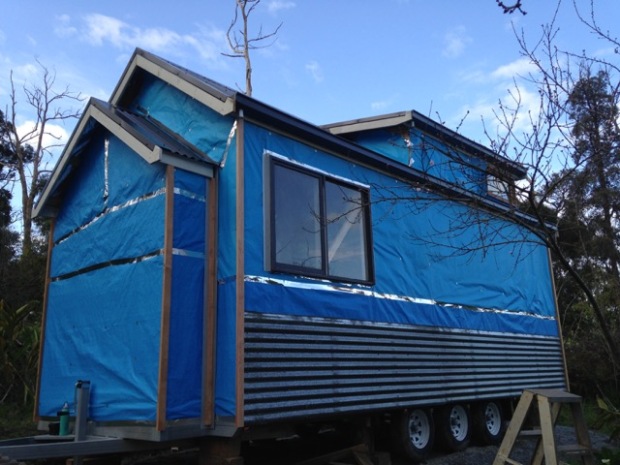
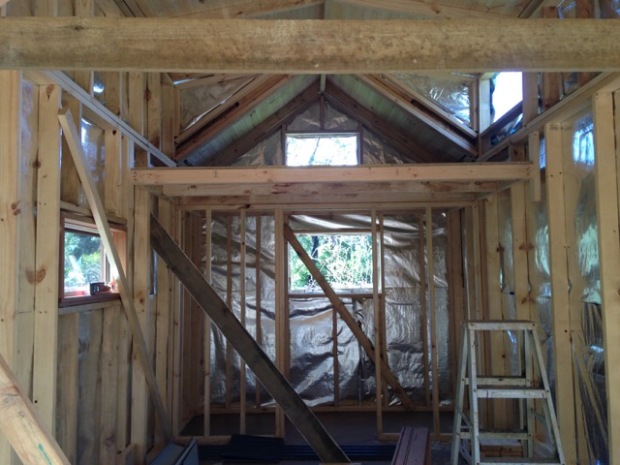
With my lovely tin skirt on, I chose to finish the cladding with profiled ply panels that will soon be painted. This part required a bit of investigating, to find something with the look I wanted that was as light as possible. With some profiled cladding coming in at close to 20kgs per square metre, I was pretty chuffed to find the rough sawn timber Shadowclad for 6.6kgs/m. The panels are light weight, durable and a lot quicker to install than individual boards, plus I had the choice to purchase them pre-primed and ready to paint. The panels come in 1200mm widths – a fairly standard width for this type of cladding, I take it. We’d had the discussion about cladding options at the start and clever Tom had the forethought to plan the framing around this – my studs were set (for the most part) up to ensure we had something to attach both edge of the panels to. Genius! Certainly not something I could’ve thought of and planned for way back in the framing days.

img_8856

If he wasn’t so good at his job I’d have words with Tom about the fact that he doesn’t take any pictures of me doing actual work. Giving us apprentices bad reps, I swear.

img_8870

img_9005

I bought 10 panels at 2400 high x 1200 wide ($107.50 each) and another 6 at 2700 x 1200 ($118.20 each) and we should have enough to clad the whole thing ($1784). There were quite a number of  small offcuts left over that I will try to use for other things inside the house, the vertical profile of the lines and overlap of the panels made them slightly trickier to incorporate. Lots of joins aren’t exactly ideal for water proofing purposes and probably more mucking around than it was worth.

img_9009

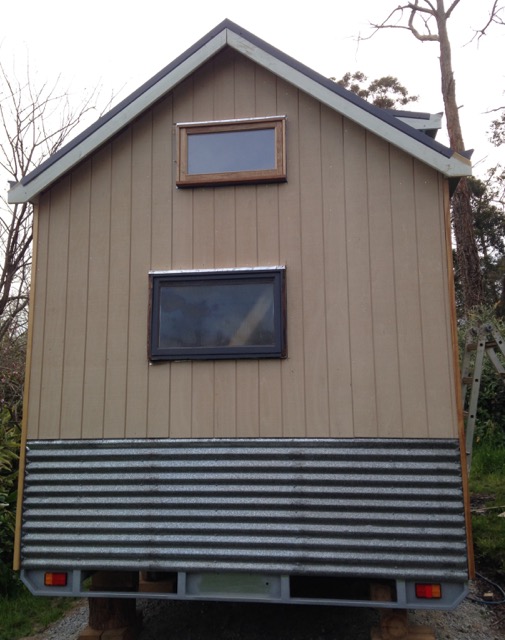
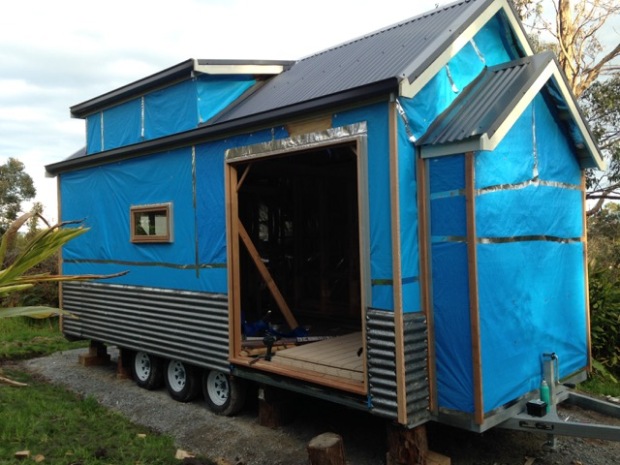
The edges aren’t totally straight where the cladding meets the tin but that’s going to be covered up with another piece of timber to tie it all together, and the top will be covered by the eaves. Takes some of the pressure off to get it all perfect! (Although more accuracy is required in other places – adjustments can’t be made board by board if things aren’t quite square.) Two days spent cladding and only the dormers left to go – not exactly sure how we’re going to get up there to do it, but it’ll happen. Doors are lined up to be hung next and then…it might be that my tiny will be at the long awaited, much fabled LOCK UP!

img_9028

Flash new tin

Last weekend was a bit of a treasure hunt and I got a little bit giddy when we lucked out and I got my hands on this.

img_8771

A quick visit to the tip didn’t prove fruitful (except for my parents who got a free load of rubbish dropped off), we tried the recycling yard with no luck. We were headed for home with empty hands when we drove past the local scrap metal yard (which I didn’t even know existed until that point) who just happened to have a stash of good quality second hand corrugated iron (also known as gal roofing tin if you’re trying to search Ebay for it, FYI). Score! There’s a few holes to patch but no serious rust or structural issues with it. And I got the whole lot for $100! Bargain.  Big thank you goes out to Sean right here, what a tip hero! And very generously helped me lug the lot up the hill to the house – much appreciated 🙂

There were a few hours work to be done on flashing the windows and putting weather stops on the corners of the house (some lovely raw cedar that I’ll varnish later on when we’re finished), but the moment finally arrived: putting the first sheets of cladding on! Pretty much as excited as I’ve been since…well probably since last week when we put the windows in. And then when we put the roof on before that. And then the framing before that. Ok fine, safe to say I’ve been ridiculously excited about every step of the project. This wasn’t an exception.

img_8800

img_8804

How great does the tin skirt look? The corrugated iron won’t go any higher than this, above the tin will be a ply cladding that I’ll paint.

Just a side note: one thing I knew nothing about and has played a much larger part in the whole project than I thought is this bloody flashing! It goes everywhere! and seems fairly important for keeping water out. It makes more sense now but it still boggles my brain a little that I didn’t even know what it was four months ago and we have literally spent days cutting and thinking about and attaching flashing to various parts of this house. I almost feel like I owe it an apology.

Sorry, flashing. You’re the best and I’ll never underestimate you again. Please keep my house dry.

If you’re starting to build a house or anything else that needs to be waterproof and you don’t know what flashing is, get to know it. There’s my advice. You can see the aluminium flashing above the doors and windows in the pictures, there’s flashing on the edges of the roof and there will be more to come on the edges of the tin skirt once the cladding is done too. It diverts water away from joins or places where it might pool and rot the timber, like above my windows or doors.

img_8806

Technical notes here if you’re interested:

  • We screwed the tin on using self tapping screws with washers (sheeting screws?), metal roofing screws attached the tin to the trailer at the bottom. Probably a fail for technical notes there because I’m not actually sure what they’re called. D’oh.
  • The sheets overlapped with no issues and the tin wasn’t tight up against the weather stop in every corner but the flashing will cover any gaps later on.
  • Tom trimmed the tin to make sure the valley of the corrugation was at the top – the ply cladding with come down and rest flat over the top of the tin and I’ll add an architrave where the ply and the tin meet to hide the join.
  • Most importantly: TIN IS STUPIDLY SHARP AND WILL CUT YOU UP AT EVERY OPPORTUNITY. I highly recommend wearing gloves. And having bandaids handy.


Windows and Doors

I’ve lost the ability to think up witty titles for these posts after a day of working outside and half a cider, so apologies in advance. As you might’ve guessed – the windows and door (frames) are in, hooray! It makes a big difference having them in, all of these additions make this little timber box on wheels feel more and more like a house.

I bought some of my windows second hand from Buy, Swap, Swell pages and one or two from gumtree. I’ve actually ended up with a shed full of extra windows, the first lots I bought were too big (according to Tom). I had originally planned to have lots more windows included in the house. Theoretically, I get the pros of having fewer windows – they’re not good insulators, you lose wall space and storage, they’re not structural, the list goes on. In the end I picked the two smallest second hand windows to use and bought three new windows that fit the size requirements and were double glazed as well.

img_8732

My new windows are Meranti timber – there was a bit of an ethical dilemma when it came to choosing the them. Meranti and Cedar seem to be both common options, both are imported woods and need a decent amount of maintenance to protect them from the weather. I spent a bit of time researching the options to see if there was an easy environmentally friendly option but most window places have their marketing down pat and reassure you that the timber is sustainable, even if it does come from Asia. As a novice, it’s hard to know the best option without breaking the budget! At this stage I’m going to varnish the windows and doors instead of paint them – this means less protection from the weather but I love the colour and look of the natural timber. The second hand windows are cedar and will need a clean up, it may end up being more trouble than it’s worth getting them stripped back to timber, I’ll see what happens there. Some painted feature windows could be fun!

img_8733

img_8748

It will be interesting to see how the house looks when it has the cladding on, there’s some decent stretches of wall there with no windows to break them up. And it’s not the lightest inside at the moment. I think that’s partly to do with the placement, there isn’t a huge amount of full sun that hits the house during the day. But the double doors will do the job and some strategic lighting and painting inside will help as well.

img_8756

So far the double timber doors are still my favourite feature and were worth the investment. The windows weren’t cheap either, with the total cost for my second hand and new windows coming in at around $1300 (plus an extra $1000 for the door). I might get some of that back if I can sell the extra windows but I doubt I’ll get much. Who knew these house things were so expensive!? On the upside, I have beautiful double glazed timber windows and doors in the house and we’re getting closer and closer to lock up…