All fired up

The last couple of posts have been more life related than build related. I have a bit to catch up on now, so here goes!

After the lining was finished, I could get the plumber and electrician back in, ready for fit out. First up was installing the flue for my Baker’s oven. Another pricey part of the build – over $500 for the flue alone! Youch. Having the elbow bends added in didn’t help with the price, but they look phenomenal (and are hard to photograph in a small space). And better yet, it all works!

img_9890

I lit the fire a few times before it was inside my house and the smoke was suffocating the whole fire box. I would’ve thought having no flue meant plenty of access to air but I was wrooong. The drawing thing that flues seem to do worked like magic and my fire was lit in seconds and burnt for ages and was beyond exciting and whoop! What a treat.

img_9893

Noel dug out some old cast iron pans he had in the shed and donated them to the cause, not to mention a Weber BBQ to boot! We had a tiny house slow cooked dinner to celebrate, it was all just terribly romantic.

img_9915

img_9921

Once I’ve got my kitchen bench set up I’ll also source a little two gas burner cooktop that can run on an LPG gas bottle for the warmer weather. The evening I lit this baby up it it was cool enough to have a small fire going for an hour with the door open, letting a fresh breeze in. I ducked under my cold camp shower and dressed in front of the oven, enjoying the thrill of my very own fire – the little wins are big wins when you can indulge in them properly. Overall I was pretty chuffed. What a perfect way to moderate the temperature of the house slightly and also be able to cook on the top! Excellent decision making, Sarah.

It wasn’t till I climbed up to the loft that I felt the full force of my designed-to-heat-90m2-and-currently-heating-18m2 oven. Fair to say that the little loft nest will be a toasty warm retreat on the coolest of winter days when the oven is lit. And by toasty warm I mean there’s a fair chance I could charge sauna rates for visiting guests if I got the set up right.

Anyone got spare towels?

Tiny hot water: the details

Ok this isn’t a for dummies post, these are the nitty gritty details of my hot water set up and what I’ll actually be using after all this research.16

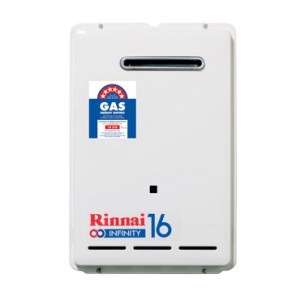
For all the reasons previously listed, I decided in the end that my hot water jacket, as romantic and appealing as it was, just wasn’t practical. Instead, I’ve opted for an instant gas hot water heater that will run from an LPG gas bottle. The model I’m going with is the Rinnai 16 , on the recommendation of my local solar and gas supplier. During my research I picked a few options, and mapped them out as follows:

Brand/Model Gas usage Equivalent Cost Pressure Details 
Joolca – shower head only 6L p/m, 28 Mj/H $20 per bottle $299 45 kPa
Bosch Ci10 10L p/m, 79 Mj/H 5.5 hours $850 50kPa inlet (100kPa constant pressure for max flow) requires vertical flueing, no power, internal installation
Rinnai Hotflo 10 10L p/m, 76 Mj/H $750 120Kpa min for max flow
Bosch 10P 10L p/m, 82 Mj/h 5.37 hours $750 55 kpa min constant for max flow external, no power, gas pilot light
Bosch 10H 10L p/m, 79 Mj/H $839 60 kpa min constant external, no power or pilot, hydropower
Rinnai Infinity 16 16/20L p/m, 13.8/125 Mj/H $750 120 kpa external, electric pilot light

The most important calculations and terms to understand here were the gas usage and the pressure requirements.

Gas usage

This is calculated in Megajoules per hour and needs converting to your relevant mode of usage. There are some useful conversion tables online and I worked out that if I’m running the hot water from a standard (BBQ size) 9kg LPG gas bottle, I’ll have about 441 Mj per tank. The Mj/h rate is a good starting point but also hard to make an accurate decision from. When I spoke to the guy from the solar and gas shop he explained that although the Rinnai has a higher max Mj/h rate, it’s also much more efficient at heating the water and so would use less gas overall to heat more of it. There are also star ratings for most models and this is a good indicator to go by apparently.

Details

The details are worth considering too. Do you need the heater to be installed internally? If so, will flueing the heater be a problem? Can it be installed externally? What sort of pilot light system will it use? Originally I had thought gas to reduce the burden on my solar system, but this means the pilot light is always lit and would be wasting a substantial amount of gas. Hydropower is another appealing option – this uses a mechanical wheel to generate the energy for the pilot light – no gas or electricity needed! I was pretty sold on the idea until I started reading some reviews online and was a bit turned off (it seems there have been quite a few problems with the mechanics in these models). I checked with my local retailer to see if he’d experienced problems as well and that’s when he turned me from the smaller Bosch system to the slightly larger (although apparently more efficient) Rinnai. The Rinnai does use electricity to spark the pilot light but I was assured this is only a tiny draw on the solar system. My solar guy agreed that it wouldn’t impact the amount of energy required but pointed out an interesting side note: the tiny draw of the pilot light may not be enough to kick my solar inverter out of sleep mode. Basically if the hot water doesn’t seem to be working, I need to go and switch on a light, ha! No hot showers in the dark for me.

Pressure

Pressure is measured in kpa (kilo-pascal) and psi (pound-force per square inch). Instant gas heaters require a minimum amount of pressure to work properly. I did consider the option of a gravity fed water system (just standing my water tank up higher than the taps and letting gravity do its thang), but without the pressure of mains water or a pump, these heaters aren’t going to work. So this brings me to the next step in the game: water pumps.

Water Pumps and Pressure Tanks

Due to the minimum required pressure of my heater, I need a water pump from my rainwater tank. To start with, I found a nice little popular 12 volt option, the Shurflo 4009. Pretty cheap but a good brand, has good reviews, doesn’t draw much power from the system and all in all seems like a good choice! If you’re running your pump on 12 volt power. Which I’m not. Power is a whole different kettle of fish that I haven’t touched yet, but I’ll get there eventually. Enough to say for now, that all of my power points are running on standard 240 volt AC power, and my pump needs to suit that system.

download-1To find a 240v pump that isn’t big or noisy and doesn’t draw huge amounts of power took a fair bit of digging. I eventually settled on a Grundfos CMB 1-36. Apparently Grundfos are a top of the range brand, are pretty quiet when running and have the lowest energy consumption I could find at 240v. The downside is that you pay for it. I’ll come to cost in a second. The other thing to keep in mind about pumps is that most of them will run constantly when your taps are turned on. This is pretty inefficient energy wise and doesn’t work well on a solar system.

Pressure tanks are a good way around the constant pressure problem, allowing you to use a certain amount of pressurised water before the pump kicks in and refills the tank. This means you can run your taps in small bursts and even maybe flush the loo (if you have one) a few times before the pump starts up. This is important because the pump can use up to seven times the amount of energy to start up as it does to run – it’s sensible to start it as seldom as possible and make the most of it while its running. I opted for a 30 litre pressure tank, which will connect to the pump and lets me use about 20 litres before the pump needs to activate. This should cover most of my day to day usage, except showering.

The Grundfos CMB1-36 doesn’t come with a pressure switch (to turn it on and off when the tank is full or empty) but my very handy local salesman said that wasn’t an issue. He rewired the thing for me then and there and added a switch on! I’m so glad I went into the shop and spoke to someone instead of just ordering the unit online. I highly recommend using the expertise and knowledge of people who work in the field, you can google and guess and figure out so much but there’s still so much to miss! Plus the price was pretty much the same in the store as online.

*

All in all though, with my $600 pump (youch!), $230 pressure tank, all the fittings and gidgets that went along with the two, the bill came close to $900. That’s just the pump and the tank, not including the heater! There are cheaper options I’m sure, but I’m aiming for quality and a highly functional and effective system. Hopefully that’s what I’ll have! I did ask the salesman if he had any other recommendations and felt quietly chuffed when he had a think and told me I’d picked the best one for my needs. Validation! Gotta love it.

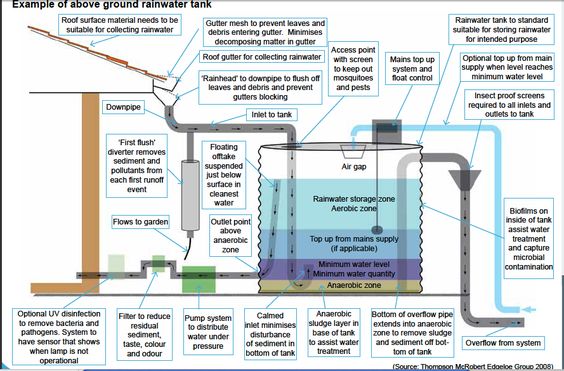
My tank arrived as well on the weekend and even I had to giggle a little. It’s…well, tiny! Puny even. It’s hard to imagine what 600 litres looks like until it turns up on your doorstep, but here it is! I have no idea if it’s going to work or not be anywhere enough water to function with but I suppose there’s only one way to find out.
img_9460

Plus if I get desperate there’s always the garden hose.

All in all it was a decent chunk out of the budget for all the plumbing materials (I picked up the flue for my stove as well, there’s another $700 for the flue kit and the elbow bends) and I haven’t even started paying the actual plumber yet! But I’m feeling pretty great about it all. They were big tricky decisions that took lots of deliberating. In the end the best advice came, unsurprisingly, from the experts. Having a good idea of what I needed and wanted and a basic understanding of all the elements involved to start with went a very long way.

The hot water system and pump won’t be active until the power is set up, that might still be another month or so away yet. But having my tank and downpipes set up to at least start catching this never ending spring rain would be nice! The grey water system will be the next challenge to tackle once the power is all bedded down I think. Still some thinking to do around that end of the operation.

Ok folks, I hope your brains as are drenched in plumbing knowledge as mine now, cos that’s all I’ve got so far. Look at us dummies go! x

Dummies guide to: Solar Hot water

EEEK! Plumber coming this weekend! Stay tuned for big updates! 😀

Before I get there though – last week I started a very loose version of a Tiny Hot Water for Dummies guide, based on the premise that I, myself, am a dummy. Through my many hours of research and calling people and guessing and getting things wrong, I’ve now worked a few basics out and it only makes sense to share. Let us unite in our dumminess!

I must admit I didn’t research the solar hot water option as thoroughly as the hot water jackets or gas because from the get go it didn’t seem like the best option for my house.  Although it’s an environmentally friendly choice, I struggled to find good options that would suit an off-grid tiny set up. I’ll try for a quick overview, but if it’s something you’re seriously thinking about then I’d get in touch with some solar hot water suppliers and see what options there are.

On the whole, it seems there are two ways to think of solar hot water:

  1. Electric hot water powered by solar energy
  2. Solar hot water

Electric hot water is probably the least efficient option for heating water. It involves a storage tank that holds the water, while an electric element heats the water inside. Think, giant kettle. It’s a little more sophisticated and there are variations on the theme but that’s the gist of it. Generally speaking, using electricity to generate heat in any appliance (toaster, hair dryer, kettle, hot water service, etc) takes massive amounts of energy. Think about how much water you heat up when you’re making a coffee or tea, for example. Do you fill the kettle all the way up, or only put in enough for your cup? Apparently, the amount of energy used to boil excess water for one day could power all the street lights in England for one night. Ridiculous! You can get small electric systems and some people do choose to use them in a tiny house, but if you’re planning to use solar to power the electric element you’ll be looking at a very pricey set up.

solarhotwater solarhotwater1

Solar hot water can be run without an electric element – either through evacuated tubes or a flat plate collector (images above). Things to keep in mind with solar hot water are:

  • You’ll need a storage tank and this is often mounted on the roof – they’re big and heavy. Not ideally suited to a tiny house with a small roof and weight restrictions.
  • I couldn’t find any systems that were designed to heat only a small amount of water. Most of them (including those pictured) are for standard homes and are pretty excessive if you’re only supplying one person in a tiny’s worth of hot water.
  • Most solar systems are combined with a gas or electric booster for when there isn’t enough power to meet all of your hot water needs. This means doubling up on heating systems and if you don’t have large hot water requirements then it just seems like extra money and work and resources for very little benefit. The amount of gas I’ll be using to heat all of my hot water is going to be pretty minimal and although I love the idea of not relying on gas, I think it’s best to pick your battles. Hot water just doesn’t seem to be one of the most effective ones to fight.

For more info on solar hot water systems jump on to the Aus government’s webpage, they have some useful starting points. It’s a brief overview I know, but there are bigger fish coming who will also need the frying. THE PLUMBER! Did I mention he’s coming this weekend? Happy Tiny Plumbing Christmas to meeee!

Big steps! 🙂

Dummies Guide to: Hot Water Jackets

Now that my rainwater tank is set to be delivered I’ve had a few more choices to make. The first is hot water. Some of these posts may be super detailed but I’m basically writing what I wish I could’ve read when I had to make these decisions. So many blogs/websites/articles start by assuming you have a clue about this stuff.  I like my building instructions the way I like my directions, based on the premise that I have no idea what you’re talking about…or where I am. So here it is, the unofficial ‘Dummies Guide to Tiny House Hot Water.’

Chapter 1: Hot Water Jackets

Ok so firstly, a quick run down on what I WANTED to do, before I get into what I’ll actually be doing. Originally I wanted to heat my water using the wood fired stove through a hot water jacket – also known as a wetback, although apparently that’s an American (and also a racist) term. This pretty much involves water running through a coil inside the stove, and heating the water when the fire is going.

The cold water runs out the bottom of the tank, through the jacket on the heater, heats up and rises back to the storage tank, where it pushes the cold water back through the cycle.  Taadaa!

domestic_hot_water_elmira

There are much more thorough and competent explanations of them online than I could offer (including lovely pictures like this one), here’s a good starting point. So without going into much more detail than that, here’s the list of things that made me change my mind and decide not to get the hot water jacket. If you’ve thought of them all then you’re already way ahead of me.

  • One of the biggest barriers was cost. I thought it would be efficient to heat water from a system I already own and will be using, but I’m just not sure that’s true when it comes to set up cost. My stove to start with was $1600, and not all stoves are made for hot water. The jacket itself is close to $300 and needs to be installed by a plumber, who would’ve had to cut holes in my stove to retrofit it. A new storage tank was over $1000 and that’s not including a header tank for overflow or pressure regulation.
    (Special note here, it took me about 15 years to find out that’s how much the tanks cost because there are secret code words for all of these parts and projects and it’s a whole new magical language. You can’t just look up ‘hot water storage tank’ because you’ll find all sorts of electric water heaters and tanks and get nowhere near close to the right thing. What you actually want is an ‘Open Vented Low Pressure Wet Back Hot Water Heater Stove Cylinder – Non Electric‘. I’m not even joking, googling this stuff is an art form in itself.)
  • I briefly looked at repurposing an electric water heater (a storage tank with an electric element inside it) and just not plugging it in so it would stay just a tank. But electric systems aren’t vented, meaning they don’t have a way to release the pressure and overflow of the water that would build up using the hot water jacket (more info on vented vs unvented here).
  • Electric heaters are also not designed for the high temperatures of a wood fired stove. Here’s another magic code word: vitreous enamel. This is what you want your storage tanks to be made from in order to withstand the heat your stove will create. Copper is apparently an option too but I couldn’t find many of those on offer anymore.
  • Even if you’re have a small system like I’ll have and won’t require that much hot water, you need to have a large storage tank  – sorry, ‘Cylinder – Non Electric’. There has to be enough space and capacity for your hot water to cycle through and cool down in the tank before it goes back through the stove. Once your fire is set to go, there’s no stopping the heat from boiling up that water. Hence the open vented and low pressure cylinder – I’ve been told things can explode. Not ideal. A large tank is an expensive purchase and you need somewhere to put it. Somewhere above your stove, which means mounted on a wall somewhere. Space is precious in a tiny so that was a big cross!
  • Putting the coil in reduces room in the stove, meaning a smaller fire box and therefore a smaller heater. This sends less heat into the house and into the oven for cooking.
  • If you don’t want to have your fire burning all year round you’re going to need a back up option. I figured instant gas would be a cheap and easy option – kinda wrong there. The cheapest gas options I found that would fit the bill come in at upwards of $600. The back up system also gets tricky because hot water jackets can’t run off mains pressure – meaning that connecting them to town water like most houses are won’t work. Gas systems, however, usually need a decent minimum amount of pressure to work. So running between two systems can be complicated. It probably means using a water pump – more equipment and more money.

There are also, obviously, lots of good reasons to use a hot water jacket to heat your water. If you already have the stove, live in colder climate and have a big enough house and water system then it makes total sense to piggy back off a wood heater to also heat your water. I love the idea of it, but sadly it just doesn’t make financial or practical sense for me to bother right now.

I’ll go into more detail on the pumps and gas systems and what I’ve chosen as an alternative in future chapters. If this hasn’t quenched your thirst for knowledge, here’s a super detailed article on water systems I found helpful for a number of reasons.  But for now – happy plumbing, fellow dummies! xx

-End of Chapter 1- 

Going off grid part 1: Water

When I was first planning this I hadn’t nutted out all the details (or any of them) and figured I could run off an extension lead and the garden hose if it really came down to it.  To start with I’d set myself a minimal budget, figuring that if I was going at this alone there was a pretty good chance I was going to end up with something not unlike a shoddy cubby house. And trust me, I’ve built plenty of those in my lifetime – shoddy being the very operable word.

I based my budget and the guess of how much I’d be able to manage on other people’s experiences, I didn’t have any other framework to go on. I’ve never built anything before (one wooden pencil box in high school and many shoddy cubby houses aside) and it seems I’ve effectively avoided buying any house related goods, pretty much, well…ever. I had no clue what I was in for. In case this blog has not already informed you of that fact.

Thankfully, I had a Tom. Suddenly, the quality of what we were building felt like something worth spending my money on. It felt less like a gamble. Well, no, not true. The whole thing still most days feels like a total gamble. But now, on the cusp of having something beautiful, something worthy of the belief that got me to the starting line in the first place, it seems silly to skimp or not go the extra mile. This is where things get serious. Do I really want to go down the easy road and run off a cord and hose from my sister’s house? It certainly seems like a quick, cheap option. Setting this tiny up to run off grid would be expensive, a steep learning curve, and yet perhaps the only way to really walk the talk in this project.

So: off grid options mean I’m looking a rainwater tank, composting toilet, solar power and a home made grey water system, to start with at least. The power, plumbing and technical elements of the house have been swamping my brain, night after night, for a few months now. I want to document as much of it as I can – firstly so I don’t forget it all as soon as I move on to the next step, and secondly because it might be useful to anyone else out there starting from scratch.

Baby steps this week include: I bit the bullet and ordered my rainwater tank! Who knew these things were so expensive? Sigh. If you’re not sick of me saying that yet, don’t worry, you soon will be. I didn’t know! I guess that’s who. I haven’t really chosen the cheapest options for many parts of this build, so I’m sure there are ways to cut costs. But someone (or a few people) said to me right at the start of this: you either have money, or you have time. Second hand, budget and do-it-yourself- options are all well and good if you have time to scour every shop, every supplier, every scrap yard. If you only have a day and a half each weekend to actually get something done and you need your materials good to go and made to fit, then you’re going to fork out a little extra, simple as that.

I found a tank supplier that makes slimline tanks, a nice oval shape that I’ll be able to mount on the front of my trailer. They were flexible in the dimensions and make the tanks out of colourbond steel, plus I get free delivery! Tanks smaller than 1,000 litres seem less common so options were also limited by my choice to go for less. Originally I was thinking something tiny, maybe a 200 litre tank. I’m not sure why, it was just the first size that popped into my head. Plus, 200 litres sounds like a decent amount, right? Well it did, until I had a look at some of the figures that make up average daily water usage.

Melbourne metropolitan water usage in 2011-2012 clocked up at each person averaging 149 litres of water per day. Tell me that doesn’t boggle your mind a little. Imagine trying to carry that much water. Or drink that. Or even imagine what size container you’d need to hold it! I’m sorry, my mind is boggled. That seems pretty ridiculous.

Showers use around 8 litres a minute, average shower length is 6 minutes (40 litres). Average flushes of a loo per person per day is 3 and even using the most efficient toilets and using the half flush, it’s 3 litres a pop (9 litres). Add to this washing hands, washing dishes, whatever you cook and drink with…it adds up! Fortunately, I don’t have a laundry to consider and the compost toilet will be discussed later. But if I’m anywhere near that kind of usage, 200 litres isn’t going very far. In the end, based on practicality and price, 600 litres seemed like a safe enough bet. If I’m using 40 litres a day, I’ll be able to last two weeks with no rain. That’s not a lot when you think about an Australian summer. Certainly changes the way you think about things, if you have to ration your resources out and can’t rely on what often seems like infinite access to whatever we want – power, water, food, you name it! Giving up convenience is a daunting thought when it’s been so hardwired into our lives.

When I placed the order, I had to specify where I wanted inlets, outlets and overflows positioned – not something I’d thought about but fairly common sense. A bit of research never hurts to see how other people do it. In case you’ve ever wondered, here’s more info than you probably want on what happens inside a rainwater tank:

bb0a6a06340381626ebed9078476040c

So much of our current lifestyles are unsustainable. We continue to flush clean, drinkable water away as waste, while people all around the world struggle to access any water at all. Girls in so many countries miss out on getting an education or employment, face dangerous conditions and walk unthinkable distances to supply their family with water. Here I am complaining about the privilege of spending money to connect running water to my house, when it’s a total gift to even have that choice. So, so lucky.

On a less serious note, that water report has made me a bit curious I must admit. Is it weird if I start keeping a tally of how many flushes I get through in a day? How many litres do you think you’d use on an average day?